User Guide
Styling the World Clock
The appearance of the clocks can be changed in multiple ways - there are thousands of possible combinations!
You can start with changing the current design with a different one from the Design Gallery that you see in the upper part of the Settings dialog:
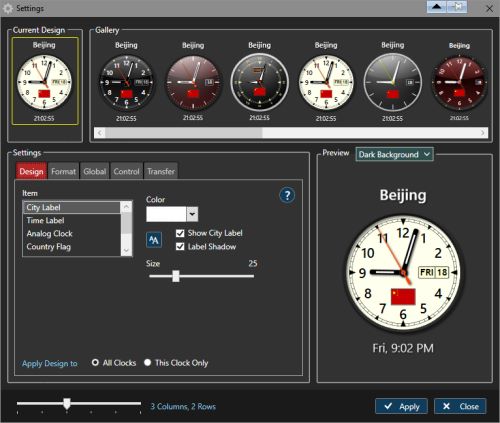
The Gallery contains a number of analog and digital stock designs, which you can select and tweak - but you can also manipulate the gallery as you like: you can remove and add designs and also save modified stock designs (notice the icons in the upper right corner). To apply a new stock design, click the clock with that design (notice that you can SCROLL the list horizontally) and click the Apply button. You do not have to accept all aspects of a pre-defined design though, you can change every detail. Here is how.
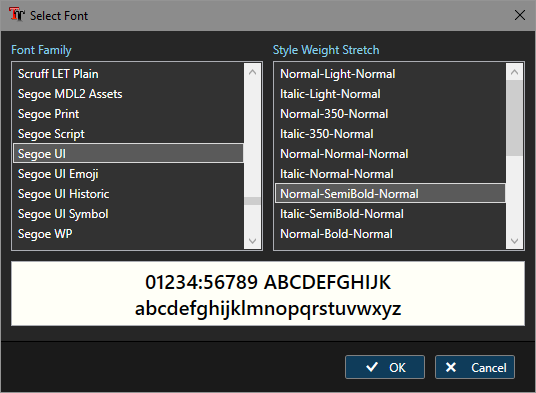
Font Dialog
Each text font can be edited by clicking this button:In the font dialog you can select the font family, style, weight and stretch. Click OK to apply.
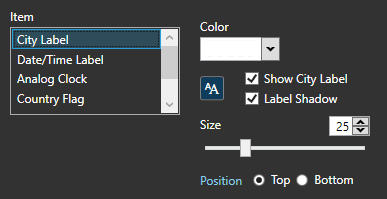
City Label
For the city label (the text label with the city name) you can change text font, color and size. Version 8.5 adds the possibility to change the position from "Top" to "Bottom".You can also apply a shadow effect (applies to the time label as well), which might make the text better readable on a transparent background:
Time Label
The time label can be changed in the same ways as the city label.Important note: the size of the city label and the time label are RELATIVE sizes - relative to each other and the clock window. If you wish to have a larget city name text and the slider is already at its maximum, you must decrease the value for the time label instead and vice versa.
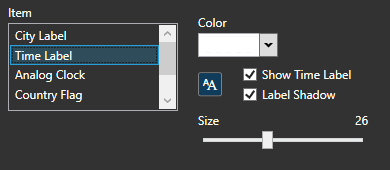
The time label can also be disabled (for an analog only clock), but usually it is shown in any configuration: in a digital clock or in an analog clock with a digital clock below the clock face.
Analog Clock: Clock Hands
The "Analog Clock" list item brings up several subitems - the first one applies to the clock hands. Here you can select the style (there are 13 styles to choose from) and the color of the hands. Some of the hand styles are dual-colored: they have a white inlay UNLESS the hand color is also white - then the inlay will be black.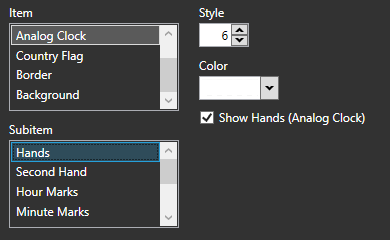
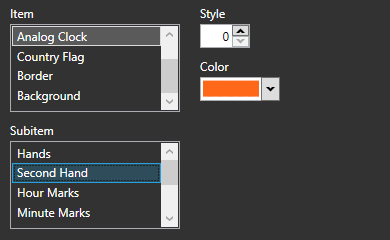
Second Hand
For the second hand there are 9 styles to select from - and you can change the color."0" means the second hand is deactivated.
Hour Marks
For the hour marks you can change the style, while 0 means "none", 1 = narrow lines, 2 = lines with 3/6/9/12 positions thicker, 3 = circles, 4 = triangles. You can change the distance to the border (radius) of the markers and weather the main positions should be disabled when numerals are enabled.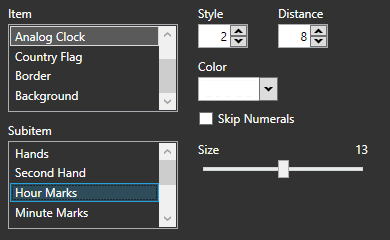
Minute Marks
For the minute marks you can also change the style, while 0 means "none", 1 = narrow lines, 2 = medium lines, 3 = thicker lines, 4 = circles, 5 = lines with radial circles. The color and the radius of the markers can be changed and weather they should be disabled in the positions where hour marks are displayed.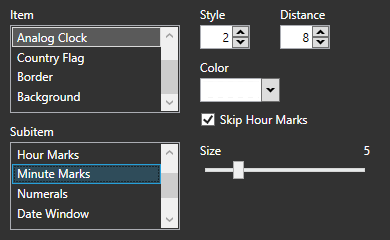
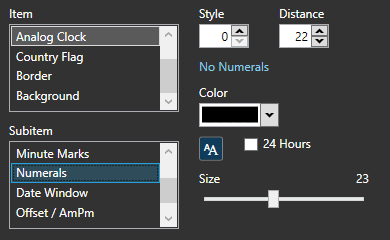
Numerals
The numerals mark the hour positions on the clock face with numbers. Here you can select these styles: 0 = disabled, 1 = 4 (main) positions upright, 2 = 6 positions (only 2, 4, 6, 8, 10 and 12) upright, 3 = 12 (all hours) positions upright, 4 = 12 positions rotated, 5 = 4 Roman numerals, 6 = 12 Roman numerals
Additional options are text font, color and radius (distance). The "24 Hours" checkbox enables the 24 hours clock mode, where the hour hand rotates 360 degrees in 24 hours.
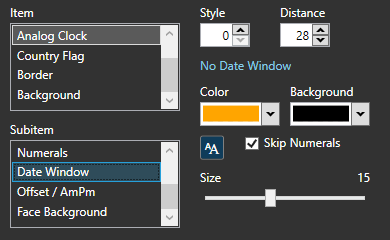
Date Window
The Date Window can show the day of the month and optionally also the weekday on top of the clock face. You have these style options: 0 = disabled, 1 = 3 o'clock position - date only, 2 = 3 o'clock position - date + weekday, 3 = 4 o'clock position - date only, 4 = 4 o'clock position - date + weekday, 5 = 6 o'clock position - date only, 6 = 6 o'clock position - date + weekday, 7 = 12 o'clock position - date only, 8 = 12 o'clock position - date + weekday.
You can also change text color and background color, size, radius (distance) and text font.
The "Skip Numerals" checkbox will disable the numeral in the position where the date window is.
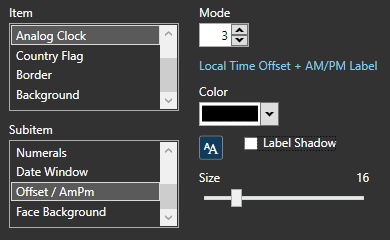
Offset / Am-Pm Labels
The "Offset / AmPm" item can activate one or two text labels in the upper corners of an analog clock, showing additional info: 0 = disabled, 1 = local time offset (upper left corner), 2 = UTC offset (upper left corner), 3 = same as (1) plus AM/PM label in the upper right corner, 4 = same as (2) plus AM/PM label in the upper right corner.You can also change font, text color, size and apply the shadow effect (applies to city and time labels as well).
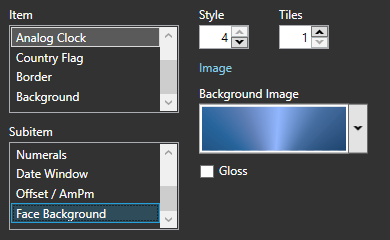
Clock Face Background
The clock face can be styled with 1 = solid color (which can also be transparent), 2 = linear color gradient, 3 = radial color gradient, 4 = background image. For background images you can also set the numer of repetitions (tiles), so you can use a smaller image as a pattern to fill the surface, which can result in interesting effects. You can also apply an artificial "gloss" effect, to make the clock face look like illuminated by a light source.
You can also change text color and background color, size, radius (distance) and text font.
The "Skip Numerals" checkbox will disable the numeral in the position where the date window is.
Country Flags
You can show a country flag on top of the clock face, for analog clocks as well as for digital only clocks. For analog clocks the normal position is in the lower part of the clock face, but you can also move it to the center or to the top. On digital clocks the flag is positioned on the left side. You can change the offset position (for analog clocks) and the size of the flag image.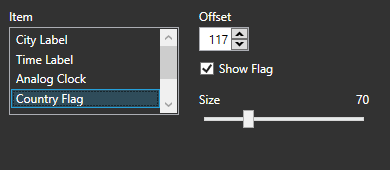
Clock Border
For the border there are 3 options: 0 = no border, 1 = light (silver) and 2 = dark. There are two sliders to adjust the outer and the inner border, which allows interesting effects for the appearance.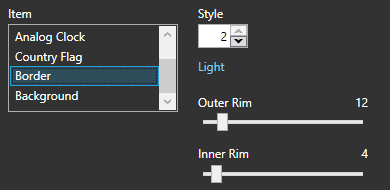
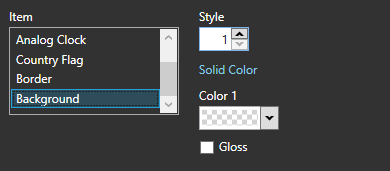
Background
Sharp World Clock can have a separate background for the clock control (Background item) and for the analog clock face (Analog Clock item - Face Background subitem). If there is only a digital clock display, you have only the first option. There are three styles, just like in the settings for the clock face background: 1 = solid color (a color can also be fully or partially transparent), 2 = linear color gradient, 3 = radial color gradient, 4 = background image.All clocks can be set to transparent (or semi-transparent, using the "Advanced" part of the color select dialog and reducing the value for the "A" (opacity) slider. That way you can make the clocks blend into the indivitual desktop.
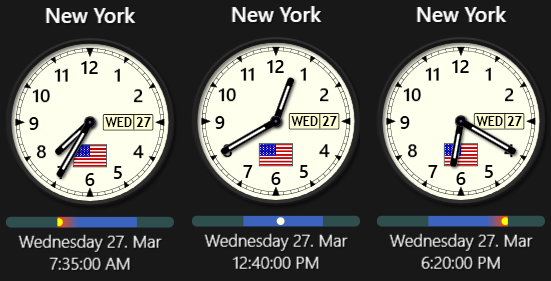
Sky Strip
The sky strip is an additional indicator for the day/night status of a city. It shows a symbolic representation of the sun, moving at the sky. The direction of the movement can be adjusted, according to the location of the user. When in the northern hemisphere, the sun rises in the east and moves to the west during the day. On the southern hemisphere it is the other way around. The hight of the sky strip can also be adjusted. The settings for height and sunrise are global and will apply to all clocks, always.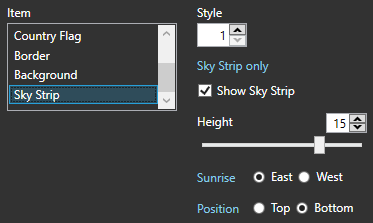
Here is a demo of what the sky strip will look like (when a height of 15 is set) - in the morning, during the day and before sunset. During the night (before dawn and after sunset) the strip will be black. On time zone clocks (like UTC) no sky strip will be shown, if enabled.
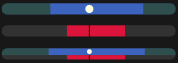
The sky strip can be positioned above or below the clocks and can optionally show the office hours status instead (or additional to) the sky simulation. The first and the last hour of office time is shown in a different color.